Save 30% off Any Shed Plan Purchase!
Signup For My 'Shed n Sight' Newsletter
and Get Your 30% off Promo Code To Use At Checkout.
- Home
- How to build a shed
- How to build shed walls
How to frame shed walls: Top diy wall framing guide
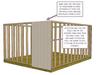
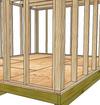
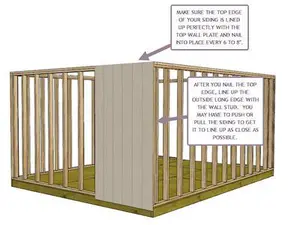
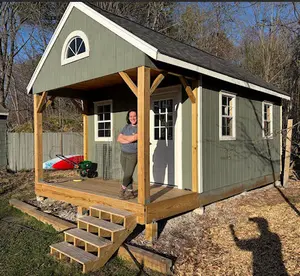
 How To Frame Your Shed Walls - Here's a Picture from my 12x16 Barn with Porch
Let me show you how to frame shed walls with the building process I have always used..
You can use the surface of your storage shed floor to build your front wall, back wall, and side walls.
I always found it easier to build my walls after first building the shed floor. This way you can build all your walls directly on the shed floor, one at a time.
Set them off to the side so you can build all of them. Then stand them up one at a time and nail or screw them down into place.
Shed wall terminology
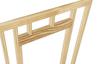
 An Example of How To Build a Shed Wall
- Double top plate - More information is included on this below.
- King studs - These are adjacent full studs on your door opening or door frames.
- Trimmer stud - This is the vertical stud on a rough opening that supports the header above the opening.
- Sole plate - The bottom horizontal board or sill plate. If you have a concrete floor, you will want your bottom plates to be pressure-treated lumber and you should place sill paper between the plate and the concrete.
- Cripple studs - These would be the short vertical studs above headers.
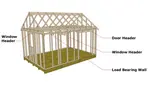
- Headers - Headers for a shed refer to the supporting structural components, typically made out of wood or metal, that create the frame above the doorway or shed windows of a shed. They help distribute the weight from the roof and walls to the surrounding studs. Headers are essential as they prevent the structure from collapsing or getting damaged due to heavy weight or external pressure or the roof framing.
- Door header - See above
- Window headers - See above
- Rough openings - This refers to framing dimensions for your doors and windows. For example, if you are going with a 3'x4' window, it's common practice to make your opening at least 1/2" larger. So for this example, your rough opening would be 36.5"x48.5".
- D nails - For framing purposes, typically you would be framing with 16d, 12d, and 10d nails, and 8d nails.
Necessary tools you will need
Circular saw
Hammer
Tape Measure
Nail gun (optional) This will make your shed building so much easier. Be careful with it though!
Drill - cordless or plug-in
Screwgun - cordless or plug-in
Speed square
Framing square
Chalk line
Saw horses
Pencils
Here's some steps to follow for building walls of your shed..
Assuming you have a set of plans ( Oh and guess what? I do sell shed plans here) that are showing the proper lengths to cut and the size of the vertical studs, like 2x4's (typical) or 2x6's, the first step measure and cut your top and bottom plates. For right now, if your plans call for 2 top plates, you will just cut the first top plate at this time.
 Shed Wall Pieces Cut and Ready to Go
Next you will want to layout marks for stud locations on your top and bottom plates.
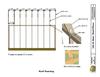
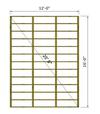
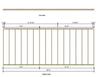
 This Example Shows 16" On Center Stud Locations For An 8' Long Wall
The picture above shows the wall plates with stud location marks. The bottom plate shown is pressure-treated, but this is not necessary unless you are building on top of a concrete slab.
Typically shed wall studs are either 16" on center or 24" on center. If you plan on using just a single layer of siding such as a 4'x8' tongue and groove panel or a 4'x8' panel like LP smartside siding, you should go with 16" on center. It is my suggestion to always frame your shed walls at 16" on center. The cost difference is minimal when comparing going with 16" versus 24" stud spacing. For example, for a 16' long wall check out the picture below showing the different stud spacing for 16" on center vs. 24" on center spacing.
The difference in cost (using the Lowes in my home town) is $14.32. Not that big of a discrepancy!
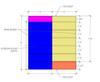
 $14.32 Difference Comparing 16" to 24" On Center Wall Framing
Continuing on with marking your shed wall stud locations
Place your top and bottom wall plates together with the short narrow sides resting down on a flat surface such as your shed floor
Now you can mark off locations for your wall studs. If you are framing in for a door and window(s) you will also mark off those locations as well. Cut your wall studs and door studs, and studs for your window framing and lay them in between your top and bottom plates in their respectful locations and nail into place. Generally you would nail from the outside of the plate into the stud using 3" to 3 1/2" galvanized box nails. Use 2 nails per stud end.
For nailing wall studs together you would want to use a shorter framing nail such as a 10d nail as you really don't want the ends of your nails protruding out the adjacent side of the studs you are nailing together.
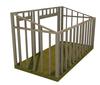
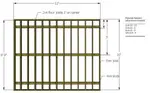
 Framed Up Shed Wall 16" On Center Wall Studs
Optional step: Nail siding panels on to your wall framing.
 Adding Your Shed Wall Siding
Sometimes you can add your siding to your framing before standing your wall up. Other instances of building your shed you may want to stand all your walls up first before adding siding.
The picture above shows LP Smartside siding being nailed onto the wall framing before standing the wall into place. Don't forget this one important point: make sure you extend the bottom of your siding down below the bottom plate enough so that the siding is down below your floor sheeting for protection against rain and melting snow.
Shed wall construction is easier with helpers!
 Use Helpers For Standing Your Shed Walls Up!
Stand your shed walls up and nail into place
Starting with whichever wall you framed up first, stand it up and nail into place using 16d framing nails. You will want to use 2 nails at each stud location and nail down through the bottom plate into the shed floor
If you have a concrete foundation, you obviously cannot nail your shed wall down into the concrete slab. For a complete guide on setting and anchoring shed walls down to concrete please have a look here.
 Adding Siding Before Standing Walls Up
Here's an example of a shed wall with the door components that have already been built and placed on the siding panels before standing the wall up.
Have temporary bracing in place to keep your shed walls from falling over
It is a good idea to have a 2x4 already nailed onto your wall that you can use for nailing to your floor to keep your wall in place while you nail the bottom plate to the floor using galvanized 16d box nail. Nail by each wall stud into your floor joists making sure that your wall ends line up with the edges of your floor.
You can assemble your other remaining walls and nail into place in the same manner as you did the first wall. As you are placing adjacent walls into place, you should nail the corners together every 12" with 10d galvanized box nails. If you are using 16d nails with a framing nailer, shoot your nails at an angle so the nail end does not protrude through to the other side of your wall corners.
 Bracing a Shed Wall
Using scrap 2x4s, temporarily brace up your walls good to your floor so that they are good and sturdy and will not move one way or the other.
What's next? Nail your second top plate on top
 Shed Walls All Framed Up and Nailed Into Place
With your exterior walls in place, nice and straight and plum, you will want to nail on the very top plate down on top of the top of the walls you just built and stood into place. This second top plate will overlap in the corners to make your walls nice, tight and sturdy.
Because of the weight of the roof it's always a great idea to have a double top plate. If your shed plans show only one top plate, and all of your roof trusses or rafters are directly over a stud location, then having just one top plate would be ok.
Next step: Add siding or start your shed roof framing
If you framed your shed walls but didn't add siding before standing them up now is the time to install your siding.
Remember these important points for shed siding:
- The bottom of you siding should extend down below the shed floor.
- If you are using panels like t1-11 you don't need to put on a layer of sheeting first.
- If you are going with siding like a lap siding, then make sure you add a layer of 1/2" sheeting first like OSB or plywood.
I would be happy to answer your question about shed walls.
Enter your question below
Questions asked from other visitors
Click below to see questions about building shed walls from other visitors to this page...
Erecting Shed Walls So The Top Is Square 
If I nail the sole plates to the joists and corners together as you say and then measure diagonals across the top to be sure the shed top is square, what …
Joining the walls of a shed to each other
Hello! My son and I are planning on building an 18'foot x 18'foot lean-to style storage shed. When I was a kid building walls with my own dad (about 60 …
Interior walls on my shed
Hi There, I have had a shed/summerouse built in back garden, I have starting insulating, I am ready to put the MDF boards on the walls and ceiling and …
Shed trusses
Do you know what the spacing is on shed trusses? I was told it was 24 inches. Please let me know, if you have time. I'm located in Michigan if that helps. …
Wall height of 2x4 on 12 x 16 gambrel shed with porch
Hello,
I bought your 12x16 barn with porch plans a couple of years ago and I am finely building it. The problem I am having is there are no dimensional …
Lean to frame
When joining wall frames together on a lean to shed, there is no double top wall plate? Correct? How do you square and join walls at corners?
Headers For Shed Doors and Windows
Do I use a single 2x6 or double 2x6's for headers above doors and windows? Thanks.
Screwing up the shed flooring
We built the flooring to a shed that put the plywood on and it's off Square but the Floor shows to be square.
Stud spacing for odd length shed floor
I need to build an 8' wide, 9' long shed. It's easy with spacing on the 8' walls at 16"OC, but how do I space the studs on the 9' wall given that 16" doesn't …
Shed Wall Frame Height
Could you scale up the wall frame models and make a wall 9 feet or 10 feet tall? What would be the cons? Only asking because I plan to make a small 10x12 …
Adding Exterior French Doors
Could the shed plans accommodate adding French doors instead or what is needed to make these additions? Our plan is to build a garden shed that doubles …
Shed Walls with Paneled Siding
Hello. If I use 8 foot studs for the wall framing but then add a top and bottom plate then the distance that needs to be covered with the siding is more …
wall panels and top plate
on my 10X12 Gable shed...I followed the instructions to nail siding with 2" below the bottom plate...this leave 2" above top plate. I'm confused about …
Gap at shed ceiling and shed walls
I have an Amish built wood shed, it's about 3 years old, It has double doors and 2 windows, I use it for outside cats, I have covered the windows with …
shed walls coming together
hello, i really appreciate your site, excellent information. if i were building shed walls like you describe here, how do the corners come together? …
Repairing shed walls, plywood and siding
My significant other is repairing our shed. He's pulled off the siding, which was a sort of siding/plywood hybrid. Now, he's bought Hardiplank, but he's …
2x6's
I have shed plans that call for 2x4's on 16", but I want to use 2x6's for at minimum R19 insulation. How do I modify the plans to accommodate this?
Material for shed walls
what material is the best to use on the walls, because home depot
gave me james hardie panel HZ10 5/16 x 48 x 96 inch Fiber Cement
Vertical siding 217950, …
Shed wall height
I like your 12x16 barn shed. Do any of your plans have walls closer to the 8' height (less floor overhang) to accommodate standard sheet goods? I would …
Anchoring walls to concrete pad
Question:
What is the best way to anchor walls to a concrete pad?
Answer:
Hi Danny,
The best way to anchor walls to a concrete pad, if the …

Connecting the walls to the floor
Visitors Question
How do I connect the walls to the floor. Sorry if this seems like a stupid question, but I can't seem to get into my head how I …
Wall plates Not rated yet
Readers Question:
What is the proper design for wall plates when the wall is longer than the length of one 2x4? For example. If the wall is 20ft long …
Are we having fun yet? I sure hope so.
Ok, on to the next step: How to build your storage shed doors
DISCLAIMER
Do not purchase materials or attempt to build this shed project unless you have studied the information provided thoroughly, and have verified all dimensions and material requirements for yourself. Also verify that the plans conform to local building codes and practices. Although every effort has been made to ensure the accuracy of the information and design, the user is ultimately responsible for the use of this information. All information provided is copyrighted and cannot be duplicated without the permission of Shedking.
You might like these
Here's How to Add Shed Windows to Your Shed and where to get them
Here's step by step instructions on how to install shed windows to your shed. From new construction to remodeling shed windows with everything you need to know.
CC Spacing
What is the best cc spacing for shed floor construction
Headers For Windows and Doors
How to make headers for door and window openings in your shed framing.


Monthly DIY
Shed-in-sight
Newsletter
Subscribing will get you discounts on shed plans, monthly updates, new shed design ideas, tips, exclusive discounts on shed building resources and tools. Learn more here.
Recent Articles
-
Erecting Shed Walls So The Top Is Square
May 22, 26 06:55 AM
 If I nail the sole plates to the joists and corners together as you say and then measure diagonals across the top to be sure the shed top is square, what
 -
Pictures of Sheds Built By Shedking Customers
May 04, 26 09:13 AM
 Visit our library of pictures of sheds built from our shed plans. Get great shed design ideas and plans for storage sheds, garden sheds and more.
 -
Women Built Sheds: Inspiring Shed Projects From Real Women
Apr 28, 26 11:01 AM
 Discover how women are taking on shed building projects with confidence and skill. Get inspired by real examples, practical tips, and step-by-step advice.


My You Tube Videos
