Save 30% off Any Shed Plan Purchase!
Signup For My 'Shed n Sight' Newsletter
and Get Your 30% off Promo Code To Use At Checkout.
- Home
- How to build a shed
- How to build a shed ramp
How To Build a Shed Ramp
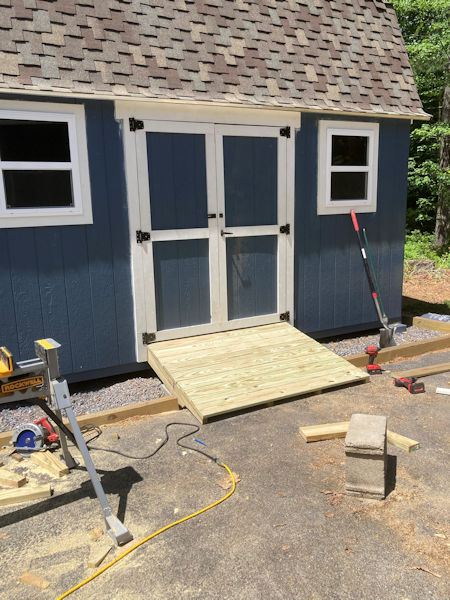 Your Shed Ramp Will Probably Be Custom!
Adding a shed ramp to your shed is not hard but there are certain factors that may make the construction a little difficult. For example if the ground in front of your shed is not totally flat your framing will be totally custom. Perhaps you can do some leveling out of the ground in front of your shed so that you don't have to do a lot of custom wood framing.
Some Shed Ramp Key Elements
- Your ramp should be framed and built with pressure treated lumber. If you build it out of untreated lumber you'll probably be replacing it every 4 to 5 years just due to the weather rotting your wood out faster.
- If at all possible, you'll want the bottom ends to be resting on a concrete base or possibly concrete blocks, or even crushed rock gravel about 4" deep.
- The support framing should be at least pressure treated 2x6's spaced 12" on center.
- The planking should be pressure treated 2x6's if at all possible.
- You'll want to use joist hangers if possible on the ends coming off your shed.
- Have a 'ledger' board to attach your ramp framing to.
 Shed Ramp Framing Ends On Concrete Blocks
 Shed Ramp Bottom Framing on A Concrete Base
The parts of a shed ramp
The picture below shows some of the key elements of building a ramp for your shed as mentioned above.
 The 'Parts' of a Shed Ramp Top View
 The 'Parts' of Shed Ramp Construction Bottom View
Additional shed ramp support
Another very important factor to consider is placing support under the back end of your ramp. Your shed may already have this as shown in the picture below. Here you can see this shed was built with skids under the floor framing. This will prevent any sagging of your shed floor from continous going in and out with heavy items like a riding lawn mower, etc.
 The Back End Of Your Shed Ramp Should Be Supported Too!
Fasteners to use
Here's the fasteners I use to build my shed ramps.
- Simpson 2x6 joists hangers nailed on with joist hanger nails. (It's important to use galvanized joist hanger nails so they don't erode)
- I screw down the ramp decking to the support boards with exterior grade 3" screws.
- I use either galvanized lag screws or bolts to attach the ledger board to the outside floor framing of the shed. Make sure to place them out of the way of where the support boards will be hanging off the ledger board. You'll want to have 2 lag screws placed vertically next to the outside support boards and 2 in between each support board.
 Attaching Ramp Ledger Board To The Shed Properly
More about shed building here.


Monthly DIY
Shed-in-sight
Newsletter
Subscribing will get you discounts on shed plans, monthly updates, new shed design ideas, tips, exclusive discounts on shed building resources and tools. Learn more here.
Recent Articles
-
Erecting Shed Walls So The Top Is Square
May 22, 26 06:55 AM
 If I nail the sole plates to the joists and corners together as you say and then measure diagonals across the top to be sure the shed top is square, what
 -
Pictures of Sheds Built By Shedking Customers
May 04, 26 09:13 AM
 Visit our library of pictures of sheds built from our shed plans. Get great shed design ideas and plans for storage sheds, garden sheds and more.
 -
Women Built Sheds: Inspiring Shed Projects From Real Women
Apr 28, 26 11:01 AM
 Discover how women are taking on shed building projects with confidence and skill. Get inspired by real examples, practical tips, and step-by-step advice.


My You Tube Videos
