Save 30% off Any Shed Plan Purchase!
Signup For My 'Shed n Sight' Newsletter
and Get Your 30% off Promo Code To Use At Checkout.
- Home
- How to build shed floors
- What is a shed foundation skid
What Is a Shed Foundation Skid?
What is a shed foundation skid and how it is used in building a shed foundation?
A shed foundation skid is used for building your shed if you are going to be building a wooden shed floor.
A skid for the most part will be a treated 4"x4" piece of lumber or a treated 4"x6"that will run perpendicular to your floor joists. Typically if your shed is 'x' foot long and 'y' foot wide, the skid will be equal to the longest measurement.
For example, on a small barn that is 10' wide and 12' long, your skid will be exactly 12' long.
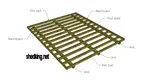
The following picture illustrates the framing for a 10x12 shed floor with 12' long skids.

Most of my shed plans specify a specific dimension, and a 10x12 shed for example will have a floor that is exactly 10' wide by 12' long. This makes framing easy, and joists are easily spaced along 12" or 16" increments. These floor joists are in turn nailed to the treated 4"x4" or 4"x6" skids running underneath them and they are supported by concrete anchors, and blocking to insure that your shed floor is not only anchored properly, but also supported properly to accept the weight loads that you intend to store in your shed.
 Shed Foundation Skids with Anchors
A shed floor that has floor joists that are spaced 16" on center will
be quite sturdy, but a shed floor that has floor joists spaced 12" on
center will be even sturdier. And, the cost for the additional joists is
minimal for the benefit gained for the extra support obtained.
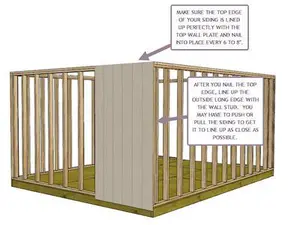
Care should be taken when nailing your floor joists to the skids. Make sure that you are lined up at the 4' increments perfectly so that when you lay your floor sheeting down, the sheeting edges fall exactly in the middle of the floor joists that are at those intervals.
This will make the task of building your wooden shed floor that much easier.
 Laying Out Shed Floor Sheeting
Benefits of Using a Shed Foundation Skid
There are many benefits to using a shed foundation skid for your shed. The most obvious benefit is that it is a quick and easy way to create a level base for your shed. The skids also provide a solid foundation that is resistant to rotting or decay.
Finally, the shed foundation skid is perfect for a small shed or tiny house. It is a great solution for those who want to build a shed on flat ground.
What are The Different Types of Shed Foundations
Before deciding building your shed floor with a shed foundation skid, it is important to know the different types of shed foundations available. The most common type of shed foundation is a concrete pad. This type of foundation requires a lot of excavation and is usually more expensive than building a wooden shed floor with shed foundation skids.
Another type of shed foundation is a gravel pad. This type of foundation is cheaper than a concrete pad but it also requires a lot of excavation. Furthermore, it is not as solid and level as a concrete pad.
The third type of shed foundation is a concrete piers or anchors as shown in an above illustration. This type of foundation is also cheaper than a concrete pad and requires minimal excavation. However, it is not as solid and level as a concrete pad.
Finally, there are on-grade foundations. These foundations are the cheapest and easiest to install. They are usually made up of solid concrete blocks or deck blocks placed on the ground. On-grade foundations are a great choice for a small shed or tiny house, but they are not as solid and level as a concrete pad or concrete piers.
How To Build a Wooden Shed Floor with Skids
(Taken from my building guide included with all shed plans and here on-line).
 Wooden Shed Floor Details
A wooden shed floor consists of the following:
- 4x4 skids or 4x6 skids that are pressure treated lumber
- Anchored 4x4 or 4x6 treated posts
- Joists -Treated Lumber
- Rim joists -Treated Lumber
- Band boards -Treated Lumber
- Floor Sheeting -Treated Lumber optional
Having level ground to build your shed floor on is the ideal situation. Unfortunately
this is seldom the case! If your ground is not level, you will have to take steps to either
level it out, or shim up your shed floor where ever necessary. The optimal system for
good support under your wooden shed floor is to have a 4” thick level bed of gravel.
This can be the entire area of the floor, or just where your skids will be located.
If you are building your shed on very uneven ground then you may have to have your
floor supported with all concrete anchored posts, or concrete posts in the corners with
some sort of support blocking in between these anchors. These can be pieces of treated
2x4's or concrete blocks
1.Cut all skids to proper length needed and place them on the ground
according to plan specifications.
2.Cut all interior floor joists and 2 rim joists to proper length and position on top of the
skids you just laid down on the ground.
3.Cut the band boards to proper length. Make marks for your joist locations
simultaneously on both band boards for nailing your floor joists in the right spots.
You'll use 16d galvanized or coated nails here.
4.Now pull the floor joists over until other ends are above the other skid and nail the
other bandboard in place.
5. With the floor framed up and band boards in place, pull your floor frame so that it is
correctly positioned over the floor skids.
6.Square up your floor by first taking diagonal measurements from opposing corners.
These two measurments need to be equal. As an example, if your shed floor is 10x12,
the diagonal measurements would be 15' 7-1/2”. Measure diagonally across the floor to
square it up, then measure diagonally across the other two corners. Shift the frame until
both measurements are the same. Using a sledge hammer and gently tapping one
corner or the other will help shift your framing to where it needs to be.
7.Double check to make sure that the 4x4 skids are in the proper position and then toe
nail your floor joists to them. Make sure that your floor joists are spaced where they
need to be. The ends of the skids should be flush with the rim joists outside face. Use
2 -16d nails per joist/skid location, one toe-nailed on either side of the joist into the
skid.
8.If you are going to use the post anchoring method, you'll want to slide your shed floor
over about 1 foot and mark the location for the holes you are going to dig. I typically
put the corner posts between the first and second floor joists. Drop your 4x4 posts into
the holes and plumb them up vertically. Mark from the bottom of the 4x4 skids
adjacent to the posts. This is where you will cut the post(s), then slide your shed floor
back over on top of the posts.
9.Make sure everything is lined up properly and your floor is still square. Attach your
skids to the tops of the posts using mending plates and then add concrete down into
the holes.
10.Next step is to nail down floor sheeting over your floor joists. Stagger your sheets
for strength. The example shown below is with 3/4” treated plywood 4'x8' sheets cut to
fit.
11.Nail the sheeting down with 8d or 6d galvanized nails every 6” along the perimeter
and every 12” inside on the joists.
12.Start the first sheet in one of the corners by first nailing the short edge making sure
its flush with the rim joist. Next you can pull or push if you have to to make sure the
long edge is flush with the band board and nail this edge next. Next you will nail the
flooring panel down along the inside floor joists.
13.Next continue on with the rest of the floor panels finishing that row first then nailing
down the rest of the floor sheets.
14.With the floor finished now you are ready for assembly of the shed walls.
Here's more information on how to build a wooden shed floor.
You might like these
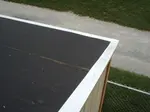
Using drip edge on your shed roof
Do you really need drip edge on your shed roof? As a professional shed builder, I can tell you that drip edge is a necessity.
Shed Floors - Band Boards, Rim Joists, Joists and Skids.
Shed floors and the different parts of a shed floor.
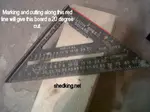
How to use a speed square for building your shed trusses and walls
How to use a speed square to easily make angle cuts for shed walls, floors, and trusses for building your shed.


Monthly DIY
Shed-in-sight
Newsletter
Subscribing will get you discounts on shed plans, monthly updates, new shed design ideas, tips, exclusive discounts on shed building resources and tools. Learn more here.
Recent Articles
-
Erecting Shed Walls So The Top Is Square
May 22, 26 06:55 AM
 If I nail the sole plates to the joists and corners together as you say and then measure diagonals across the top to be sure the shed top is square, what
 -
Pictures of Sheds Built By Shedking Customers
May 04, 26 09:13 AM
 Visit our library of pictures of sheds built from our shed plans. Get great shed design ideas and plans for storage sheds, garden sheds and more.
 -
Women Built Sheds: Inspiring Shed Projects From Real Women
Apr 28, 26 11:01 AM
 Discover how women are taking on shed building projects with confidence and skill. Get inspired by real examples, practical tips, and step-by-step advice.


My You Tube Videos
