Save 30% off Any Shed Plan Purchase!
Signup For My 'Shed n Sight' Newsletter
and Get Your 30% off Promo Code To Use At Checkout.
- Home
- How to build shed floors
- Anchoring your wooden shed floor
Anchoring a Wooden Shed Floor
Need to know how to anchor your wooden shed floor? Here's the method I use and one that is widely accepted for building codes across the country. Please check with your local building inspection office to make sure this method is acceptable in your county.
Why should you have anchors under your shed floor?
Typically most wooden shed floors need and should have some sort of anchoring. If not, they stand a better chance of being moved by heavy winds or changing weather situations such as seasonal freezing and thawing which could cause ground movement under your shed floor.
Movement of a shed even just fractions of an inch can play havoc on your shed doors. Floor movement will cause your doors to get out of alignment thus making it really difficult to open and close your doors, and will just get worse during the lifetime of your shed.
You may also be looking at an unsafe condition where your roof framing is compromised and that could be the worst thing to happen.
Here's an Explanation on How I Anchor My Shed Floors
The easiest way for me to explain the floor method I use to get the anchors positioned right where they need to be is this.
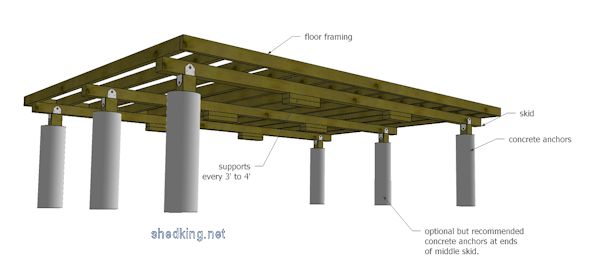
First off, the anchors are just that, anchors. They also provide support. Normally for small sheds it's not necessary to have any more then four anchors. One in each corner. For support along the rest of the floor skids this can be accomplished by placing blocking between the anchors. This blocking can be treated 2x4's, concrete blocks, etc.
If you use 2x4's, or any treated lumber, try to nail it to its
adjacent skid to prevent any movement of the blocking. If you use
anything else you can't nail, try to use construction adhesive.
Now,
build your floor frame according to your instructions. You know you need an
anchor in each corner according to plans. So, after you have your floor
framed, level it up with 2x4's laying flat in each corner, (away from
where your anchor posts will be.)
You want to position these
so that once you have your floor level and squared, take some sort of
marking paint and spray under each skid corner exactly where you want
your post to be dug. You will have 4 spots marked.
Now, and
you will need help for this. You and your helper, positioned on the same
long side but in the corners, should be able to grab the floor frame
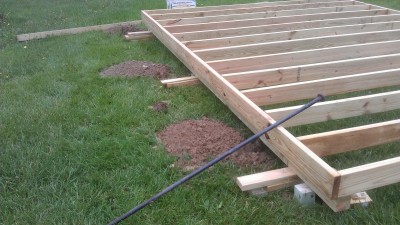
and pull it about 6 to 8" over, exposing the marks. Now you can take
your post hole digger and dig your 4 holes to a depth that is a few inches deeper than your localities freeze depth. Where I live for example here in Ohio I need to dig my holes at about 33" to 36" deep.
The 2x4's
you laid down act as supports to keep it level, but also allow you to
slide it back enough to allow you to dig your holes.
With your
holes dug, place your treated 4x4 posts in the ground. They should be pretty
close to the skids they will be supporting. Make a mark on your post
that corresponds to the bottom of the skid right next to it.
Take your post out and cut it flush on your line. Drop it back in the hole and repeat this proceedure for the remaining 3 posts.
Now, slide your floor back in place so that the skids are located exactly about their supporting post.
Make sure your floor is still level and square. Attach the skids to the posts with the mending plates.
Now you can fill your holes with concrete and allow to set up over night before removing supports.
Make sure to have enough supports along the remainder of the skids in between the anchors. My general rule of thumb is to place them every 3' to 4' along the skids.
Hope this helps you out in your quest for learning how to build a shed.
What to do for uneven ground?
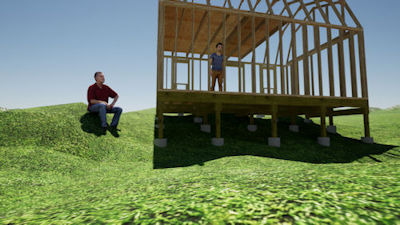 Sloping and Uneven Ground Under Your Shed Floor
You've got it made if you are going to build your shed in a spot where the ground is level and you don't have to worry about sloping ground. But what do you do in a situation where you want to build your shed where you've got uneven ground or ground that slopes so much that it's impossible to frame your shed floor and support it evenly?
There are a variety of solutions that you can use but the one solution I like to use is similar to using a combination of blocking and concrete anchors and support beams.
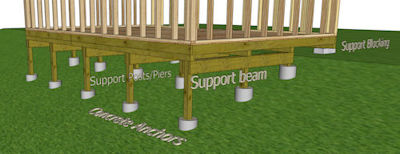 How To Build Your Shed Floor on Sloping Ground
Looking at the above picture you'll see that the ground under this shed is quite a bit lower in the back than it is in the front of the shed. Here in this example the floor is framed with treated 2x6 floor joists with 4x4 skids spaced evenly under the floor joists. Under the back 3 4x4 skids are 2x8's bolted to 4x4 posts/piers going down into concrete anchors.
It's important to note that the skids are spaced about every 3' under this 12'x20' framed shed floor, and the support anchors are spaced about the same. This may be over kill but I have always believed that it's best to go a little overboard and build a shed structure that is as safe as it can possibly be.
The building process is somewhat backward from what I explained above when building a shed floor on even ground. With ground that is uneven, your first going to have to lay out the locations of your support anchors. Next you'll have to actually dig the holes for all the anchors and set your concrete with the posts so that the post height is somewhat higher than your shed floor. Then you will have to determine the height of the framed floor and figure out where the support beams need to be bolted to the support posts, then set your skids, then frame your shed floor. It's going to take some good and accurate figuring in this situation!
The front of the shed which rests on the upper slope of the ground could also have concrete anchors but in this example I show just 8x16 concrete blocks that are 4" thick supporting the front floor skid.
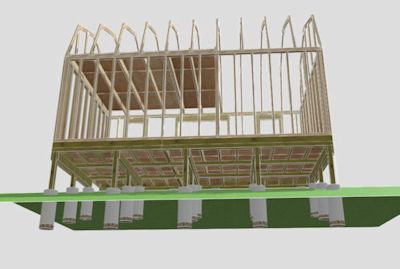 Support Anchors Need to be Below Freeze Depth
Monthly DIY
Shed-in-sight
Newsletter
Subscribing will get you discounts on shed plans, monthly updates, new shed design ideas, tips, exclusive discounts on shed building resources and tools. Learn more here.
Recent Articles
-
Pictures of Sheds Built By Shedking Customers
Jan 29, 26 06:39 AM
Visit our library of pictures of sheds built from our shed plans. Get great shed design ideas and plans for storage sheds, garden sheds and more. -
12x16 Barn with Porch Plans, barn shed plans, small barn plans
Jan 28, 26 04:55 PM
Easy 12x16 barn shed plans with porch. How to build a small barn using 3d construction models , building guides and materials lists. -
Barn Shed Plans with Big Lofts
Jan 23, 26 06:38 AM
My barn shed plans come with full email support, detailed building guides, materials lists, and they are cheap too!
My You Tube Videos
