Save 30% off Any Shed Plan Purchase!
Signup For My 'Shed n Sight' Newsletter
and Get Your 30% off Promo Code To Use At Checkout.
Ridge Beam ....
How To Build a Shed Roof With One.
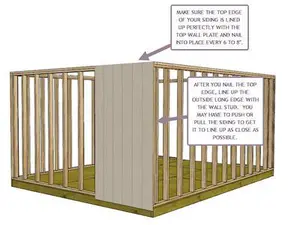
Framing in a ridge beam in shed roof construction is not hard. Here's a picture of a gable style shed using a ridge beam.
Hey there, fellow DIY enthusiast! If you’ve ever dreamed of building your own shed and are ready to tackle the roof, you’ve clicked on the right article. Today, we're going to dive into a step-by-step guide on how to build a shed roof with a ridge beam. This method isn't just robust but also adds a charming aesthetic to your storage solutions.Before we get our hands dirty, let's understand what a ridge beam is. A ridge beam is the top horizontal support in a roof, connecting opposing rafters at their peak. It bears much of the weight of the roof and ensures the structure's stability.
**Materials Needed:**
- Ridge beam (sized according to your shed's width and load requirements)
- Rafters
- Joist hangers
- Plywood sheathing
- Roofing felt
- Shingles
- Nails and screws
**Tools Required:**
- Hammer
- Circular saw
- Measuring tape
- Chalk line
- Level
- Safety glasses and gloves
Let’s get started!
Step 1: Planning and Design
Start by determining the pitch of your roof, which is its incline. Typical sheds often use pitches like 4/12 (a rise of 4 inches for every 12 inches horizontally). Consider also the size of your shed and subsequently, the length and height of the ridge beam.
Step 2: Preparing the Shed Walls
First up, make sure your shed walls are level and sturdy enough to support the roof. The top plates of the shed walls should be flat and securely fastened to accommodate your roofing structure.
Step 3: Securing the Ridge Beam
With assistance, lift your ridge beam into position. It should sit centered and flush on the top of both supporting walls. Ensure it's perfectly horizontal using a level.
Step 4: Attaching Joist Hangers
Fix joist hangers onto the face of the supporting walls at points where each rafter will connect. These hangers help to secure the rafters firmly to the wall.
Step 5: Cutting and Installing Rafters
Cut your rafters to meet the calculated angles and lengths. Begin by attaching one rafter at each end of the ridge beam to create stability. Make sure each rafter fits snugly into its joist hanger before securing it with nails.
Step 6: Assembling Additional Rafters
Continue fitting and securing rafters along the length of the ridge beam, maintaining even spacing between them. Use your chalk line to ensure all rafters are aligned.
Step 7: Adding Roof Sheathing
Once your frame is stable, lay plywood sheathing across the rafters. Begin at the bottom and work your way to the top, ensuring each piece is nailed securely at each intersection with a rafter.
Step 8: Installing Roofing Felt and Shingles
Roll out and staple roofing felt over the sheathing, starting from the bottom edge of the roof and overlapping each successive layer to prevent water infiltration. Follow this by laying shingles, starting at the bottom and working upwards.
Step 9: Final Touches
Inspect the roof to ensure everything is well-attached and tight. Trim any overhanging edges and clean up your work area. Don't forget to step back and admire your handiwork – building a shed roof framing with a ridge beam isn't something everyone tackles!
**Safety Tips:**
- Always wear protective gear while working.
- Ensure ladders are stable and securely placed.
- Handle power tools with care, and make sure they are stored safely when not in use.
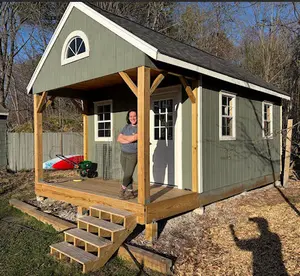
Building a shed roof with a ridge beam can be a gratifying project, giving you not only additional storage space but also the satisfaction of having built something robust and beautiful with your own hands.
Don't shy away from adding personal touches to your shed. Whether it's decorative trim, a unique shingle pattern, or even a weather vane, these details can make your shed uniquely yours.
Remember, the key to a successful DIY shed building project is preparation. Take your time in the planning phase to ensure that all dimensions and materials are precisely accounted for. This preparation will save you time and material waste.
Moreover, don't be afraid to ask for help. Heavy lifting, such as raising the ridge beam, is best and safely done with an extra pair of hands. Sometimes, a little help from a friend or family member can make all the difference.
Additionally, as you embark on this DIY venture, keep in mind that patience is just as crucial as the tools and materials. If things don’t go as planned on your first try, take a step back, figure out what went wrong, and give it another go.
Embrace this learning experience and remember – every nail, beam, and drop of sweat contributes to turning your vision into a reality. So, gear up, follow these guidelines, and start building. Your perfect DIY shed awaits!

Now if you have done any looking around this site, you'll quickly see that I am not a fan of using a ridge beam in shed construction. I always, always build trusses. Its the way I was trained to build sheds.
I am not saying it's the best way, I just know how to build sheds better by using trusses for my shed roof construction.
By the way, if you would like to see how I build shed roofs with trusses, check out the following link: How to Build a shed roof.
I can't ever recall seeing a saltbox shed built with a ridge beam, or even a gambrel roof shed for that matter. Come to think of it, the only style shed I can see that would be easy to use a ridge beam is the gable style shed.


Monthly DIY
Shed-in-sight
Newsletter
Subscribing will get you discounts on shed plans, monthly updates, new shed design ideas, tips, exclusive discounts on shed building resources and tools. Learn more here.
Recent Articles
-
Erecting Shed Walls So The Top Is Square
May 22, 26 06:55 AM
 If I nail the sole plates to the joists and corners together as you say and then measure diagonals across the top to be sure the shed top is square, what
 -
Pictures of Sheds Built By Shedking Customers
May 04, 26 09:13 AM
 Visit our library of pictures of sheds built from our shed plans. Get great shed design ideas and plans for storage sheds, garden sheds and more.
 -
Women Built Sheds: Inspiring Shed Projects From Real Women
Apr 28, 26 11:01 AM
 Discover how women are taking on shed building projects with confidence and skill. Get inspired by real examples, practical tips, and step-by-step advice.


My You Tube Videos
