Want to Save 20% off Any Shed Plan Purchase!
Signup For My 'Shed n Sight' Newsletter
and Get Your 20% off Promo Code To Use At Checkout.
- Home
- How to build a shed
- How to build shed floors
How To Build a Wooden Shed Floor
 How to build a shed foor
Having a sturdy shed floor is crucial to maximizing the life of your shed. If the construction is not done properly, a multitude of problems will and can occur over the life of your shed. Here are just a few:
- Initial construction will be harder for the rest of your shed if you don't build the floor right.
- Door can become warped.
- Windows can leak.
- Roofs can leak.
- Dangerous conditions can continue to crop up.
 Wooden Shed Floors Should Be Anchored Down
 Proper Shed Floor Construction is Crucial!
There is more than one way to build a shed floor and this is how I build my wooden shed floors.
The following instructions refer to different terms like band boards, rim joists, floor joists, and skids. If you are unsure of what those terms are please have a look a my shed floors page.
1. Check your local building codes if you haven't already to determine what type of anchoring you need to do for your shed.
When building your shed floor its a great idea to check your local building codes.
Chances are if you have applied for a permit you'll know the answer to this question already. Usually, there are two types of anchoring if you are not building on top of a concrete slab. One way is to anchor your shed to the ground using cable tie-downs, or anchoring it with your floor being fastened securely to posts which are sunk into the ground at a pre-determined depth in concrete.
Make sure whatever is required by your county that you follow their guidelines.
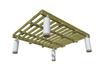
2. Gather the proper lumber to cut your floor joists, rim joists, and 2 two band boards and 4x4 skids. Cut all floor joists to proper length along with your 2 rim joists and two band boards and skids. Also, cut your 4"x 4" skids to length.
3. After cutting all lumber, mark off your two band boards for joist layout at 12" on center. Assemble the frame using 16d galvanized common nails, making sure to check each joist for crowning and install it with the crowned edge up.
Building your shed floor on skids.
 Taking Diagonal Measurements
4. Lay out your 4" x 4" skids properly spaced and lined up on your foundation, making sure they are level. Set the floor frame on top of the skids and measure the diagonals from one set of opposing corners then the other set of opposing corners to make sure it's square.
At this point, toe nail all joists to your skids using 16d common nails. The joists which fall at the 4', 8', and 12' ( joists that are on the 4' increments) lengths along your skids should be measured before nailing to make sure they are nailed exactly on center at those distances. This way, when laying your decking (or flooring) down, your edges will fall right in the middle of your joists for easy nailing.
5. Whichever method you need to use for anchoring your shed, it should be done at this step before laying down and nailing your floor sheeting.

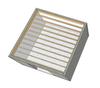
Stagger your floor sheeting when building your shed floor.
 Stagger Your Floor Sheeting
 Shed Floor Sheeting with Treated Plywood
6. Now lay out your floor sheeting starting with one of the front corners first. The reason for this is that you want the front part of your floor looking nice. It's the first thing visitors will see when stepping into your beautiful new shed. Use 8d galvanized box nails driven every 6" along the edges and every 12" in the field.
7. It's best to nail the shorter 4' side first. This way you will be able to pull the longer side over to align up with the outside edge of the floor framing. This will ensure that your floor sheeting will be squared up properly. Of course, if your floor framing is not perfectly square then your floor sheeting is not going to line up properly.
Here's an example of laying floor sheeting on an 8x10 shed floor.
 Steps For Laying Shed Floor Sheeting
Adding a ramp to your shed floor.
 Building a ramp to your shed floor
It's easy to add a ramp to your shed floor. Many sheds will serve the purpose of having a place to store riding mowers, 4 wheelers, outdoor equipment, etc. You'll want to build a ramp to make it easier to move these items in and out of your shed.
DISCLAIMER
Do not purchase materials or attempt to build this shed project unless you have studied the information provided thoroughly, and have verified all dimensions and material requirements for yourself. Also verify that the plans conform to local building codes and practices. Although every effort has been made to ensure the accuracy of the information and design, the user is ultimately responsible for the use of this information. All information provided is copyrighted and cannot be duplicated without the permission of Shedking.
You might like these
Shed Floors - Band Boards, Rim Joists, Joists and Skids.
Shed floors and the different parts of a shed floor.
Rim Joist in Shed Floor Framing
What exactly is a rim joist and how it is used in building a shed floor.
Shed Floor Skids
Shed floor skids will help support your shed floor. They will also allow you to anchor your shed floor to the ground using concrete piers. See how here.


Thinking about a concrete shed floor?
More information about how to build a shed.
Do You Have a Question about Building Shed Floors?
Enter your question below
What Other Visitors Have asked...
Click below to see questions about building shed floors from other visitors to this page...
Frame assembly? 
Part 3. "assemble the frame". How to assemble the frame with no flat area (e.g. Outside on the grass etc). Also do you use clamps to hold in place before …
Floor Joist Spacing
I have 16' x 16' footer in my back yard with 6" block walls on it. The northern wall is 16' outside measure long. The eastern/western walls are only 7' …
Depth of anchors
Here in Florida freezing is not an issue. How deep should I place 4x4 posts and 12” concrete cylinders to ensure solid foundation and anchorage in our …


Monthly DIY
Shed-in-sight
Newsletter
Subscribing will get you discounts on shed plans, monthly updates, new shed design ideas, tips, exclusive discounts on shed building resources and tools. Learn more here.
Recent Articles
-
Joining the walls of a shed to each other
Apr 02, 24 09:49 PM
Hello! My son and I are planning on building an 18'foot x 18'foot lean-to style storage shed. When I was a kid building walls with my own dad (about 60 -
Types of Roofs For Sheds: Designs, Materials, and Styles
Feb 07, 24 10:23 AM
 Various types of roofs for sheds including gable, hip, gambrel, saltbox, flat, and more. Gain insights into designs, materials and styles.
 -
How to build a shed roof, Shed roof construction, Shed roof design.
Feb 07, 24 09:17 AM
 Here's a simple how to build a shed roof guide. Your shed roof construction and shed roof design from building simple shed roof trusses right here at shedking.net
My You Tube Videos
