Want to Save 20% off Any Shed Plan Purchase!
Signup For My 'Shed n Sight' Newsletter
and Get Your 20% off Promo Code To Use At Checkout.
- Home
- How to build shed doors
- Shed doors
How to Build Shed Doors
 Proper Shed Door Construction
Learning how to build shed doors is perhaps one of the most difficult tasks in building your shed! The directions below are one way of building your shed doors, and I have more links at the bottom of this page for different methods.
 Sample Double Shed Door Construction
The following directions on building 2 - 5' wide double shed doors are for a saltbox style shed. You can however use the method for any style shed, and it requires siding your shed with 4'x8' siding panels like T1-11 or 'LP Smartside' siding panels.
When I built sheds professionally I liked to build my shed doors before I made my shed walls, because with the saltbox shed, you actually lay the doors onto your wall studs, nail them into place, then raise your wall on your floor and your done, front wall complete with doors.
This is unique with this style shed only as the front wall, and back wall for this shed form the unique tunnel form of construction which I love to use when building my sheds.
More about this tunnel system when you get into the wall building section.
- First step in deciding about your shed doors is the size. I always believe that with sheds, the bigger the better. You can put 4' doors on your shed, but down the road you may need a bigger opening.
Perhaps you may get a mower in the future that has a 54" cut! Try to get that through a 48" door way opening.
Good luck. It is not going to cost you that much more, so my advice is to go ahead and build the biggest door you can. 6' is great, 5'is ok, and 4' I don't even recommend. - Now, grab 2 of your siding sheets and lay them out on a flat surface so that the edges overlap, just the way they would if you had just closed your shed doors and the inside edges overlapped and made a light free closure. Make sure you lay them down with the finished surface facing up.
 Using Siding Panels for Door Construction
Assemble your 2 - 2x4 hinge boards first, making sure they are lined up as follows:

Now, to determine your door panel length from top to bottom, if your wall height is 'x' feet, add 2" to this height and this is what the total length will be for your door panels which will get nailed onto your wall studs for the front wall. An important point to remember is that your door height should be about 6'.
On a saltbox shed, your wall height for the front and back walls should be no less than 6.5' to 7' measured from the top of finished floor surface to top edge of your wall.
Again, add 2" to this length because this will allow 2" of your siding to be nailed to the floor structure when you stand your walls up and are able to nail to the floor rim joists, or outside band boards. Now, go ahead and measure and cut the bottoms of your panels you just laid down to this length.
Lay the cut panels back down flat on a surface, such as a garage floor, etc., and starting with the left panel first, you'll want to lay out your 2x4 members and door stiffeners that form the front design of your door exactly how they will be. Please note that which ever door overlaps you'll want to line up the 2x4 right on the vertical edge. The other door has the vertical 2x4 lined up just to the other side of the groove so that when your doors are fully assembled and on your shed, they will overlap properly when closed and the 2x4 vertical members will not interfere with the closing. Please refer to illustration below.

Follow my diagram for cutting, and layout and line up the pieces (and you can even mark the outlines with a pencil) exactly the way they will look on your door when it is finished. Once you have cut and fitted the pieces and know they are going to fit, take them all off, stand your left piece of siding up and proceed to nail, one by one, each of the pieces in their exact location. This may take a second person for help to hold each of the pieces while you are nailing them. I recommend using a pneumatic stapler with 1" galvanized staples nailing from the back side of the siding into the 2x4 members.
If it isn't possible to do this, then you'll definitely need some assistance. One of you will have to hold the piece into place while the other nails from behind with #8 common galvanized nails. I do recommend however at least renting a compressor and pneumatic air stapler for your door assembly. It will make building your doors much easier. But, be careful and follow all safety instructions when using pneumatic air tools, as they can be dangerous if used improperly. But, if you have assistance and want to save the money, go ahead and by all means nail by hand the old fashioned way.
Once you have the left side finished, lay it back down with the right side panel, and lay it as if the doors would be if in the closed position already on your shed. Now you can lay out the 2x4 members on the right panel, lining them up exactly in unison with the left side panel (i.e., you'll want the top and bottom 2x4's to line up and be even with the left side door panel when looking at your shed with doors installed). Again, mark or outline the 2x4's, take them off, and stand your right door panel up just as you did with the left door panel, and proceed to fasten the 2x4 front members securely to the panel from behind again.
Now, here is an important measurement to take. Lay your finished door panels on the floor as if they were closed exactly the way the will be when standing up on your front shed wall. Measure the bottom panels from hinge to hinge. Write this measurement down. This will be the distance between the inside edges of your mounting studs on your front wall, less When you get to the point of building your front wall, your space your door studs at this distance. The half inch difference allows you to install your doors so that when closed, your hinge cut will be lined up in from the edge of your wall stud, thus preventing any air and weather gap. In other words, when you close your shed doors, the hinge cut will be over a wall stud, thus helping to prevent any inclement weather from going through your door hinges.
 Completed Double Shed Doors
Making Hinge and Top Cuts on Your Storage Shed Doors
At this point, you will need to take one of your completed door assemblies and lay it face up on a pair of saw horses. You will need to mark the location of the top corner of your hinge assembly by taking one of your 16d nails and nailing it directly through your door siding. This will mark the intersecting corner of your top and side cut of your door.

Now, turn your door over and again lay it flat on your saw horses, face down. We are going to mark the top cut along the top of the door, and down along the middle of your hinge boards. You can use a chalk line for this marking (preferred method), or take a straight 2x4 and mark along the edge of it from the nail all the way down to bottom of the hinge middle, and then from the nail over to the top edge of your inside 2x4 door member. Please see illustration.
 Use a Reciprocating Saw For Door Cuts
Installation of your door latch and hasp is not necessary at this point in time and will come later in your shed construction.
Another method to building double shed doors
Framing for shed doors and windows.
DISCLAIMER
Do not purchase materials or attempt to build this shed project unless you have studied the information provided thoroughly, and have verified all dimensions and material requirements for yourself. Also verify that the plans conform to local building codes and practices. Although every effort has been made to ensure the accuracy of the information and design, the user is ultimately responsible for the use of this information. All information provided is copyrighted and cannot be duplicated without the permission of Shedking.


Monthly DIY
Shed-in-sight
Newsletter
Subscribing will get you discounts on shed plans, monthly updates, new shed design ideas, tips, exclusive discounts on shed building resources and tools. Learn more here.
Recent Articles
-
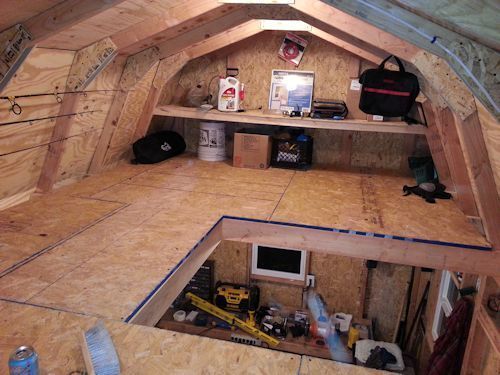
Building a Shed Loft Made Easy
Apr 30, 24 05:18 AM
 Here are some shed loft illustrations showing the framing for adding a shed loft to increase your storage space.
 -
Joining the walls of a shed to each other
Apr 02, 24 09:49 PM
Hello! My son and I are planning on building an 18'foot x 18'foot lean-to style storage shed. When I was a kid building walls with my own dad (about 60 -
Types of Roofs For Sheds: Designs, Materials, and Styles
Feb 07, 24 10:23 AM
 Various types of roofs for sheds including gable, hip, gambrel, saltbox, flat, and more. Gain insights into designs, materials and styles.
My You Tube Videos
